
Interested in how you can add Stickers to your scavenger hunt? To be honest, it helps if you are a Photoshop wiz… But luckily this blog post will speak to all users, beginners and pros. Don’t sweat it, you can still create fun personalized stickers for your mobile game! Stickers in the app are basically Augmented Reality graphics, and if you’re wondering “What is Augmented Reality?”, check out our other post where we go over what is Augmented Reality, and how it can enhance your mobile campaign.
In this blog post, we will go over a step-by step-guide on how you can create awesome Sticker challenges for your game. Alternatively, if you don’t have the time, or frankly don’t want to bother, the helpful designers at Social Scavenger can build Stickers for your next mobile adventure.
Selecting a Great Image for Your Sticker Challenges
To begin, you’ll have to consider what kind of graphic/text you want floating above your camera screen. Is it for informational, branding, silly or for fun purposes? These are some things to keep in mind when selecting the image you will be using for Sticker purposes:
- The process is much simpler if you select an image that has a solid white background
- Your canvas size should be 645 x 860 pixels and your image should be proportionately sized within that canvas
- When positioning your image on the canvas consider how your user will interact with this image i.e. if it’s a hat – put it near the top of the canvas. If it’s a banner – maybe the bottom
- Refrain from making your image too intricate while you are learning. Less is more!
Here are some examples of good, clean and simple Stickers:


Here are some examples of complex bad Stickers:


Once you have chosen your image, it’s time to create a challenge. But before we can upload your file, we must make it Social Scavenger-friendly. This requires just a little bit of photoshop and saving under the right file type, then it’s smooth sailing from there.
Creating Your Sticker
If you know how to use Photoshop here are your simple instructions:
- Create a transparent .PNG with a canvas size of 645 x 860 and size your image appropriately within that frame.
- This is what will show up when players open up the camera in the challenge.
- Don’t worry if you’re unsatisfied, moderators can always adjust AR files again after.
- Keep the overall file size under 200kb if you can – faster load times.
If you’re newbie to Photoshop, keep reading! First open your file under Photoshop. It’s helpful if your image is already on a solid background: 
Here we have a mouse ears for our headpiece. It’s on a nice solid white background, so removing the background will be easier later on. Removing the background white colour enables us to make the image transparent, so users can be in the image (and not blocked behind a white screen.) Get started by selecting the “Magic Wand” tool. The one that looks like, well, a magic wand: 
To remove the white background (and create a transparent background) elect your solid background(the part you want to eliminate). There should be a dashed line surrounding your image like so: 
If you’re working from a Mac, press the ‘delete’ key. If you’re working on a PC, press the ‘backspace’ key. Your background should be erased and replaced with a gridded background. Congratulations, you made your first transparent image! Now it’s ready to be added to your challenge. Removing the background, leaves just your image to roam and overlay on top of your camera: 
To ensure the best quality and fit of your Augmented Reality image, the canvas size of your whole file should be 645 x 860 pixels. To do this go to Image>Image Size. You’ll be prompted with a box, uncheck ‘Constrain Proportions’ if it isn’t already. Change the Width: 645 and the Height: 860 in pixels. Click OK and your image will resize itself: 
This part is imperative in making your AR image to show up in your mobile game. Make sure you save your file as a .png so it can be camera-friendly. To do this, go to Save as>[your file name]>PNG>Save:  And your Sticker is completed! This image will show up when users open up the challenge, and your image will be overlaying on top of the camera. Note: You don’t have to be bounded by strictly images, you can also add text as your Sticker.
How to Upload Your .PNG Sticker File onto Your Scavenger Hunt Challenge
Now you have your Sticker files set up and ready to play. Open up your mobile game click ‘Add new challenge.’ Select your challenge and press the ‘Edit’ button:  To select a challenge type, go to ‘Complete by:’ and click ‘Augmented Reality’ in the drop down tab:
  After you choose your challenge type, you’ll be able to upload your AR file. To do this, select the lower icon image and click ‘Select Image.’ Find your .png AR file and then click ‘upload.’:
  Wait a few seconds and your AR file should show up in the small icon box. You may choose how your want your AR image to overlay in the camera. Floating will let your users move, resize and flip your file. Fullscreen means your image will be fixed and cannot be altered when in camera-mode:
Great, Now You’ve Created a Sticker Challenge
This is the basic process in uploading and creating your own Sticker challenge. Now go play with your Sticker challenge as soon as you click Save! Keep reading below if you’re interested in personalizing your Sticker challenge even further.
What I can I expect when I Open My Game through the App?
Open your game on your smartphone and find your newly created Sticker challenge. Tap ‘Complete’ on the bottom right to get started: 
Setting your Sticker Image to Floating
If you set your challenge as Floating, the player will be prompted with this screen that will enlighten them on how to manipulate your AR image: 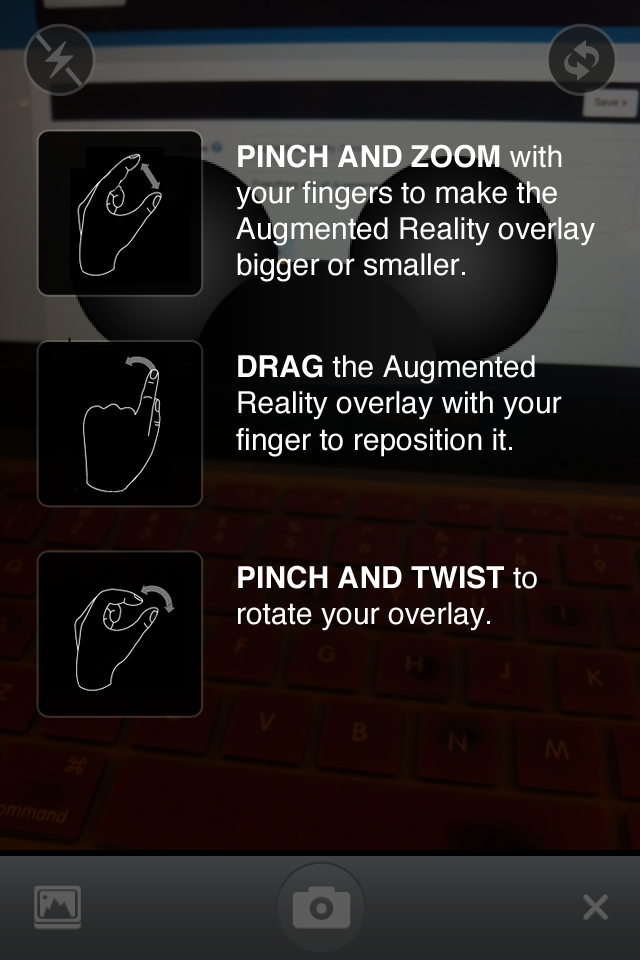 The top right circle will allow players to switch back and forth between their back and front camera, so let them choose accordingly. Floating allows you to resize your Augmented Reality Image, but as you can see, the AR image is too small to fit on this girl’s head:
You can also flip and rotate your Augmented Reality Image:

Setting Your Stickers to Fullscreen
.. Will pretty much be the same process, except users will not be able to move/rotate/skew your image. It will remain locked on the screen.
When you’re pleased with your image (or if the ears can somewhat fit your head..) add a caption, and tap ‘Done.’


Players have the option of sharing their Sticker-fied Picture by logging into their social media through the app. Once they complete the challenge, it will be updated in the Live Stream to be viewed:

There you have it, those are the basic fundamentals in building and playing your Sticker challenge in the app! Continue reading if the thought of customization has perked your interest.
Customizing Your Sticker Challenge
Now to personalize your challenge with all of Social Scavenger’s features! Start off by naming your challenge and giving it a clever description:  Upload an image for your challenge icon. This will show up when your users play your game in the app. Select your file>Upload:
 ![]() Take advantage of the game features to make each challenge unique. You could appoint a point value:
Take advantage of the game features to make each challenge unique. You could appoint a point value:  Designate a location where your Sticker challenge can be played:
  Lock your challenge. This means you cannot participate in this challenge unless you complete another prerequisite challenge, be present in a designated location, or be within vicinity of an iBeacon (mixes things up a little and makes it a little more difficult):
  Players would want to view content from other players, right? Make sure the last feature is turned on to ‘Show.’ This means all pictures taken from this challenge will show up in the Live Stream for everyone to enjoy:
  Make sure to click Save when you’re finished customizing your challenge. And there you have it, you’ve just made your first Sticker challenge! Make one, make two, make twenty! Each challenge can be as similar or as unique as you like- you have 6 features to make each challenge stand out. Reach to us if you’re interested in getting your own mobile app, or try out your own free trial challenge.